
I recently received Emails for my Shopify stores Momma Bears Creations and InkedWith regarding missing DMARC DNS entries. The Email was titled: Add a DMARC record to continue sending emails from your domain. An example of the Email is below
Gmail and Yahoo have announced changes that require you to add a DMARC record on your domain before February 1, 2024 if you’d like to continue sending emails from a branded email address.
Currently, your emails are sending from my_store_email, and we have detected that you have no DMARC record on your domain.
If you take no action, we will rewrite your sender email to [email protected] to meet the minimum requirements so that you can continue sending emails to your customers with no interruption.
Learn more about how Shopify is addressing these changes.
What is a DMARC DNS record?
After getting these emails, I was curious about Domain-based Message Authentication, Reporting, and Conformance (DMARC) records. I decided to ask Bard for an explanation with the prompt: what is a dmarc DNS record. Bard’s explanation is the content that follows:
- It’s a type of DNS TXT record that tells email receivers how to handle messages that fail authentication checks based on SPF (Sender Policy Framework) and DKIM (DomainKeys Identified Mail).
- It’s designed to protect your domain from email spoofing, phishing attacks, and other fraudulent email activity.
Key elements of a DMARC record:
- Name:
- It’s always
_dmarc.yourdomain.com, replacingyourdomain.comwith your actual domain.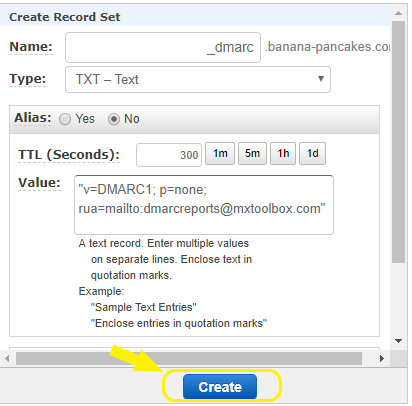
- It’s always
- Value:
- Contains various tags and values separated by semicolons, specifying your DMARC policy and preferences:
- v=DMARC1: Indicates the DMARC record version.
- p=policy: Specifies the action to take on unauthenticated emails (quarantine, reject, or none).
- rua=email address: Specifies where to send aggregate reports about email authentication.
- ruf=email address: Specifies where to send forensic reports about specific failed emails.
- pct=percentage: Sets a percentage of emails to apply the policy to, starting with a low percentage and gradually increasing.
- Contains various tags and values separated by semicolons, specifying your DMARC policy and preferences:
How it works:
- When an email recipient receives an email claiming to be from your domain:
- They check your SPF record to verify that the sender’s IP address is authorized to send emails on your behalf.
- They check your DKIM signature to verify that the email content hasn’t been tampered with.
- If both checks fail, the recipient consults your DMARC record for instructions on how to handle the email.
- The recipient follows the policy specified in the
ptag (quarantine, reject, or none). - You receive DMARC reports at the specified email addresses, providing insights into email authentication results and potential threats.
Benefits of using DMARC:
- Protects your domain from spoofing: Prevents unauthorized senders from using your domain to send fraudulent emails.
- Improves email deliverability: Authenticating your emails can help ensure they reach your recipients’ inboxes.
- Boosts brand reputation: Protecting your domain from abuse strengthens trust in your brand.
- Provides valuable insights: DMARC reports help you identify potential security issues and unauthorized email senders.
Incorporating DMARC into your email security strategy is essential for protecting your domain and ensuring the integrity of your email communications.
In addition to the above response from Bard, it provided me with a link to more detail on the MxToolbox site.
What DMARC Settings Should I Use?
When it comes to enabling any new security “thing”, I prefer the crawl, walk, run approach. I like to start out crawling by first just enabling some monitoring/auditing to see what is being identified. After that, move to some kind of policy that is in alert mode. Finally, setup enforcement and begin taking action.
In applying this logic, to DMARC, I decided to setup the following entry on my domains:
v=DMARC1; p=none; rua=mailto:[email protected]
The v=DMARC1 is a fixed value. This is saying which DMARC version we’re using. As of this writing, DMARC1 is the only version. Keeping in line with my crawl, walk, run approach, I’m setting p=none meaning that no policy should be applied to emails. Finally, the rua setting is to tell mail servers where they can send reports when message authentication fails.
What Happens Next?
I had zero idea what happened next to be honest. It didn’t take long for me to get something in my inbox. About a day after adding the DMARC records, I got my first Email with the subject: [Preview] Report Domain: inkedwith.com Submitter: enterprise.protection.outlook.com Report-ID: 6d61656ef72841079dab98de42510b9e. The contents of the email was:
This is a DMARC aggregate report from Microsoft Corporation. For Emails received between 2023-12-22 00:00:00 UTC to 2023-12-23 00:00:00 UTC.
You’re receiving this email because you have included your email address in the ‘rua’ tag of your DMARC record in DNS for inkedwith.com. Please remove your email address from the ‘rua’ tag if you don’t want to receive this email.
Please do not respond to this e-mail. This mailbox is not monitored and you will not receive a response. For any feedback/suggestions, kindly mail to [email protected].
Microsoft respects your privacy. Review our Online Services Privacy Statement.
One Microsoft Way, Redmond, WA, USA 98052.
Attached to the this Email was a gzipped XML file called enterprise.protection.outlook.com!inkedwith.com!1703203200!1703289600.xml.gz. I dumped the file to VirusTotal quickly to make sure it was safe. All looked good so I gunzipped it and looked at the XML file
<?xml version="1.0"?>
<feedback xmlns:xsd="http://www.w3.org/2001/XMLSchema" xmlns:xsi="http://www.w3.org/2001/XMLSchema-instance">
  <version>1.0</version>
  <report_metadata>
    <org_name>Enterprise Outlook</org_name>
    <email>[email protected]</email>
    <report_id>6d61656ef72841079dab98de42510b9e</report_id>
    <date_range>
      <begin>1703203200</begin>
      <end>1703289600</end>
    </date_range>
  </report_metadata>
  <policy_published>
    <domain>inkedwith.com</domain>
    <adkim>r</adkim>
    <aspf>r</aspf>
    <p>none</p>
    <sp>none</sp>
    <pct>100</pct>
    <fo>0</fo>
  </policy_published>
  <record>
    <row>
      <source_ip>209.85.167.42</source_ip>
      <count>1</count>
      <policy_evaluated>
        <disposition>none</disposition>
        <dkim>pass</dkim>
        <spf>pass</spf>
      </policy_evaluated>
    </row>
    <identifiers>
      <envelope_to>blankt.com</envelope_to>
      <envelope_from>inkedwith.com</envelope_from>
      <header_from>inkedwith.com</header_from>
    </identifiers>
    <auth_results>
      <dkim>
        <domain>inkedwith.com</domain>
        <selector>google</selector>
        <result>pass</result>
      </dkim>
      <spf>
        <domain>inkedwith.com</domain>
        <scope>mfrom</scope>
        <result>pass</result>
      </spf>
    </auth_results>
  </record>
</feedback>
Great! This is useful, right?
Understanding the Report Structure
DMARC reports are XML files containing detailed authentication data. Depending upon the number of Emails that you are sending, these could be large files. I hadn’t sent many emails from my domain yet so my report was rather small. The XML reports are broken down into the following information
- Reporting organization
- Domain being reported on
- Date range
- Authentication results per Email
- Policy enforcement per Email
From my XML example, we can see that the reporting organization was Enterprise Outlook. The domain they are reporting on is inkedwith.com. The date range of this report covers from GMT Friday, December 22, 2023 12:00:00 AM (1703203200) to GMT Saturday, December 23, 2023 12:00:00 AM (1703289600).
...
    <org_name>Enterprise Outlook</org_name>
    <email>[email protected]</email>
    <report_id>6d61656ef72841079dab98de42510b9e</report_id>
    <date_range>
      <begin>1703203200</begin>
      <end>1703289600</end>
    </date_range>
  </report_metadata>
  <policy_published>
    <domain>inkedwith.com</domain>
    <adkim>r</adkim>
    <aspf>r</aspf>
    <p>none</p>
    <sp>none</sp>
    <pct>100</pct>
...
We see that my published policy is none. Then we see the authentication and policy enforcement of each email in the record element.
...
  <record>
    <row>
      <source_ip>209.85.167.42</source_ip>
      <count>1</count>
      <policy_evaluated>
        <disposition>none</disposition>
        <dkim>pass</dkim>
        <spf>pass</spf>
      </policy_evaluated>
    </row>
    <identifiers>
      <envelope_to>blankt.com</envelope_to>
      <envelope_from>inkedwith.com</envelope_from>
      <header_from>inkedwith.com</header_from>
    </identifiers>
    <auth_results>
      <dkim>
        <domain>inkedwith.com</domain>
        <selector>google</selector>
        <result>pass</result>
      </dkim>
      <spf>
        <domain>inkedwith.com</domain>
        <scope>mfrom</scope>
        <result>pass</result>
      </spf>
    </auth_results>
  </record>
...
I have my policy set to none so the disposition was none but also because everything passed. If you look at the dkim and spf, you can see that they passed. I think these tests deserve a deeper explanation in another article.
The identifiers show the from and to domains, inkedwith.com and blankt.com respectively. The auth_results section provides additional details on the dkim and spf results.
Putting it All Together
In short, the DMARC reporting and domain fraud is used to help us understand how emails are being handled by remote servers. The DMARC DNS entry tells other Email servers how they should handle Emails that fail authentication. Continuing the crawl, walk, run approach, I’m going to monitor these reports and failures. Once I see that Emails are being handled appropriately, I’ll set the policy to quarantine. I’ll also change the pct to maybe 25% so that not 100% of the Emails are quarantined.
After continued monitoring, I’ll plan to ramp up to 50%, 75%, and then to 100%. Finally, I’ll look to change the policy from quarantine to reject but this will take time!
What Else?
After writing this post, I realized that it made sense to further explain SPF and DKIM records. Feel free to checkout my post called From Jargon to Genius: Cracking the Code of SPF and DKIM DNS Records where I explain these DNS records.