I started messing around with my WordPress by first adding in a layer of security in Adding Nginx in Front of WordPress. After putting Nginx in front of my WordPress, I decided that I would further secure it by also Building a Static WordPress. That’s great and all but maybe it was time to make Nginx give me some performance gains rather than just some security controls. That is exactly what we’re going to do in this blog post. Now that Nginx is sitting in front of WordPress, we can use it to control some of the performance aspects.
Generating a Baseline Performance Report
First thing’s first though. Let’s first get us a baseline of where the site is at and what needs work. Google’s PageSpeed is a great tool for finding out what’s slowing down your site. Below is the report for this blog.
I guess those numbers aren’t terrible but I’m sure they could be better.
Figuring Out What to Fix
As you scroll down the report, there are a number of things to correct. An example of such things would be the Opportunities section:
In addition, there are some diagnostic items that show up:
Fixing Some of the Items
Adding a Caching Policy
An initial first step to correct some performance issues, would be to enable caching policies on the Nginx server. Given that we’re serving mostly all static content now, there’s no need to cache any content that we serve up. Nginx is already serving static data so we don’t need to rely on a backend. Let’s modify the static path’s caching policy for clients by adding the cache-control response header:
This example configuration snippet shows that we are adding the Cache-Control response header to the requests to “/”. This means we’re doing what we planned and are only telling clients to cache data that isn’t sent to the backend WordPress server. Additional parameters that can be supplied to Cache-Control are documented here.
Enable Gzip Compression
By default, even with gzip on, Nginx will not compress all files. Let’s add some additional content to our http config block (note the additional gzip directives bolded listed below gzip on):
With those changes added to our Nginx configuration, restart Nginx for the changes to take effect.
Testing Our Page Again
Now that those changes should be live in your Nginx, let’s check how we did again on PageSpeed.
The numbers aren’t amazingly stellarly awesomer but they are better. If you look at the overall scoring, we jumped from a 66 to a 72. The final problem left is not something we can correct using Nginx. There are a number of first and third party scripts that are loading and slowing the site down. Next steps will involve researching those scripts and attempting to determine if there are any that can be removed. Until next time!
Now that I have Nginx in Front of WordPress, I thought the next logic step was to try and hide my WordPress even more. What exactly would this mean? In my mind, I figured that I would restrict access to all of the backend functions of my WordPress site to just my IP Addresses. From there, I would simply serve static versions of the content.
Part of the reason that I can do this is because my site is mostly static. I don’t allow comments or other dynamic plugins. The site is only used to publish my blog posts and that’s about it. I also setup WordPress to use the permalink format of /%year%/%monthnum%/%post_id%/
First Step, Mirror the Site to a Private Repo
Just as the heading states, I needed to first get all of my content available outside of WordPress. Luckily, I realized that I had a few previous blog posts:
that could help me accomplish the initial steps. I won’t completely bore you with the details contained in these posts. I’m going to assume that you can get a basic idea of how to setup the private repo using Creating a Private GitHub Repo. You can setup your repo however you like but for future planning purposes, I decided to create a html directory inside of it to house the website files. My initial repo looked like the following:
% ls -al
total 8
drwxr-xr-x 5 salgatt staff 160 Dec 31 08:46 .
drwxr-xr-x 49 salgatt staff 1568 Jan 7 12:32 ..
drwxr-xr-x 15 salgatt staff 480 Jan 7 09:05 .git
-rw-r--r-- 1 salgatt staff 18 Dec 30 18:57 README.md
drwxr-xr-x 4 salgatt staff 128 Jan 5 21:31 html
With the private repo created, I needed to get all of my content into the repo for later use by Nginx. I just did a wget to pull only the page content down. The reason I did this is because there were a number of js and css files that are required for the admin pages and possibly for other “things” that I might not use right away:
% cd html
% wget --mirror --follow-tags=a,img --no-parent https://blog.shellnetsecurity.com
--2021-01-07 16:37:24-- https://blog.shellnetsecurity.com/
Resolving blog.shellnetsecurity.com (blog.shellnetsecurity.com)... 157.230.75.245
Connecting to blog.shellnetsecurity.com (blog.shellnetsecurity.com)|157.230.75.245|:443... connected.
HTTP request sent, awaiting response... 200 OK
Length: 17266 (17K) [text/html]
Saving to: ‘blog.shellnetsecurity.com/index.html’
blog.shellnetsecurity.com/index.html 100%[=======================================================================================>] 16.86K --.-KB/s in 0.09s
...
--2021-01-07 16:37:41-- https://blog.shellnetsecurity.com/author/salgatt/page/2/
Connecting to blog.shellnetsecurity.com (blog.shellnetsecurity.com)|157.230.75.245|:443... connected.
HTTP request sent, awaiting response... 200 OK
Length: 41746 (41K) [text/html]
Saving to: ‘blog.shellnetsecurity.com/author/salgatt/page/2/index.html’
blog.shellnetsecurity.com/author/salgatt/p 100%[=======================================================================================>] 40.77K --.-KB/s in 0.1s
2021-01-07 16:37:44 (398 KB/s) - ‘blog.shellnetsecurity.com/author/salgatt/page/2/index.html’ saved [41746/41746]
FINISHED --2021-01-07 16:37:44--
Total wall clock time: 19s
Downloaded: 56 files, 2.7M in 3.4s (821 KB/s)
My wget command runs the –mirror command to ummm mirror the site. I do the –follow-tags=a,img so that I only nab the html plus images and follow only href tags. Finally, I want to stay within my site and not download any other sites’ content by issuing –no-parent. With that, I now have a blog.shellnetsecurity.com directory in my repo’s html directory.
% ls -al
total 0
drwxr-xr-x 4 salgatt staff 128 Jan 5 21:31 .
drwxr-xr-x 5 salgatt staff 160 Dec 31 08:46 ..
drwxr-xr-x 18 salgatt staff 576 Jan 7 08:38 blog.shellnetsecurity.com
Now, I need to get all of my static content into the repo as well. In order to do that, I just did a simple copy of the static files from my container running wordpress using kubectl cp:
% kubectl cp -n wordpress wordpress-85589d5658-48ncz:/opt/wordpress/wp-content ./blog.shellnetsecurity.com/wp-content
tar: Removing leading `/' from member names
% kubectl cp -n wordpress wordpress-85589d5658-48ncz:/opt/wordpress/wp-includes ./blog.shellnetsecurity.com/wp-includes
tar: Removing leading `/' from member names
These copy commands grab ALL files in these two directories. The idea is that I’m grabbing the js and css for any plugins running in my WordPress and any theme related files. Since these directories contain PHP files and other files I don’t need in my static repo, I remove them with a nice little find command:
At this point, I now have a repo that should have all of the content ready to go. I commit all of the changes and push the changes to main.
Serve the Static Repo
Like I said before, I’m not going to clutter this post with the details that can be found in Building a Kubernetes Container That Synchs with Private Git Repo. Assuming you have this all ready to go, I’m going to cut straight to the configuration portion. I’m assuming the nginx container is mounting the private repo at /dir/wordpress_static. I am also going to build upon the nginx configmap that was created in Adding Nginx in Front of WordPress. I’m first going to change the root directory to be the static WordPress blog:
Through some trial and error, I found that I needed to have all of the following paths allowed for my admin functionalities:
/wp-admin
/admin
/wp-login
/wp-json
Since these are required for admin functions, I have made sure to run my IP restrictions on them and only allow my addresses to access them. For now, I am managing my sitemaps from within WordPress so I also allowed requests from any clients to go directly to my WordPress server still (something I’ll correct in a future post when I talk about automation). Aside from these exceptions, I’m using try_files to find the other content. This means that requests for any other content will be sent into the root directive, aka /dir/wordpress_static/html/blog.shellnetsecurity.com, aka the private repo! Notice the trailing /index.html on the directive? That just means that I’ll serve /index.html whenever the page isn’t found.
With that, I am now serving content from my mirrored content that is running from the private repo. I can still manage my WordPress site like I normally do from the backend and generate content and make changes and life is mostly good.
I am an idiot
Yes, you don’t need to tell me this! I know there are some obvious flaws in what I’ve setup like:
What happens when I post a new article?!
What do I do when WordPress is upgraded?
What happens when a plugin is upgraded?
Do you know that doing a wget for just pages won’t download pretty little images?
Did you know that serving /index.html for css/jpg/png/js files is ugly?
This manual process is terrible!
I know! I have already begun to tackle these and I’ll have more details on that when I write my Automating Static WordPress Updates (Currently in Draft). As a sneak peak to all of this, there’s a really cool WordPress plugin that will send various notifications to Slack. Oh the fun that we will have when talking about using Slack as a message bus and writing and app and and …. ok I’ll contain my excitement for now!
The future is here! In my previous article, Testing Out the Digital Ocean Container Registry, I talked about using the Digital Ocean Container Registry to build a custom nginx. In that article, I talked about the future, aka a future, aka this post. When I moved to WordPress, I did so using Digital Ocean’s 1-Click install to drop WordPress into my Kubernetes cluster. This was the easy way to go for sure. I already run Kubernetes so deploying it to an existing cluster made life easier on me. Who doesn’t love it when life is made easier?
There are a few drawbacks to the 1-Click install. I’m planning to tinker with something really cool down the road to fix one of those problems (I know the future again). Luckily, I’m going to address my first initial concern in this post. What is that concern you ask? Protecting my WordPress admin of course! Sure, there are a number of WordPress vulnerabilities roaming around and talks of zero days and the sort. I make life easier on any attacker if I just leave my WordPress admin open to anyone. In this post, we look at taking my custom nginx and deploying it in front of my WordPress site to enforce IP access control to the admin page.
Setting Up the Container Registry for Kubernetes
In my Testing Out the Digital Ocean Container Registry, I explained how to get a custom nginx into the Container Registry. In order to use that container and registry with my cluster, I had to enable DigitalOcean Kubernetes integration in the settings of the registry. You can do the same by doing the following:
Login to your DigitalOcean account
Go to the Container Registry link
Click on the Settings tab of the Container Registry
Click the Edit button next to DigitalOcean Kubernetes Integration
Place a check mark next to the Kubernetes clusters that you want to have access to this registry (Note, if you have multiple namespaces, this action will add access for all namespaces).
Once these steps are complete, you can confirm access by looking for a new secrets in your cluster:
# kubectl get secrets
NAME TYPE DATA AGE
default-token kubernetes.io/service-account-token 3 423d
json-key kubernetes.io/dockerconfigjson 1 396d
k8-registry kubernetes.io/dockerconfigjson 1 18d
key-secret Opaque 2 419d
Notice the k8-registry secret that I now have in my secrets list? You can also see that this exists in my wordpress namespace as well:
# kubectl get secrets -n wordpress
NAME TYPE DATA AGE
default-token kubernetes.io/service-account-token 3 18d
k8-registry kubernetes.io/dockerconfigjson 1 18d
wp Opaque 1 18d
wp-db Opaque 2 18d
Adding Nginx to the Cluster
This should be super easy! I start by first creating configMap that stores my Nginx configuration:
I mostly added a set of standard nginx configurations. If you look at the serverConfig closely, you’ll notice that I’ve directed the access_log and error_log to /dev/stdout. This is so all of the logs are written to stdout (duh). This also allows me to run kubectl logs -f on the created pod and see the access and error logs.
Nginx is going to be acting like a reverse proxy so I took a relatively standard default site-available configuration and added a few new location blocks. The /status block is simply for me to perform healthchecks on the running nginx instance. The other statements are proxy_pass statements to send requests to the “wordpress” pod that was installed by the 1-Click install. I’m also making sure that I send over the Host header with blog.shellnetsecurity.com. If I don’t do this, the 1-Click install will build funky URLs that don’t work. Luckily, it will read the Host header and build links based upon that. I force the host header to be what I want with this statement.
Finally, you’ll see my allow statements for 1.1.1.1 and 2.2.2.2 (not really my IPs but let’s play make believe). These are followed by deny all. This should make it so that only my 1.1.1.1 and 2.2.2.2 addresses are allowed to /admin and /wp-admin. All others will be denied.
Next, I create a Deployment yaml that tells Kubernetes what containers to build and how to use my configMap:
Take note to the blue colored text above. I am using the imagePullSecrets configuration to tell kubernetes that it will need credentials to access the container registry where my image sits. I am also pointing it to the k8-registry credentials that were added by the DigitalOcean Kubernetes Integration change we made earlier. Finally, I am also providing the full path, version tag included, to the custom image I am hosting in the DigitalOcean registry with the image statement pointing to registry.digitalocean.com/k8-registry/c-core-nginx:1.1.
Next up, I need to add a NodePort that I can configure on the load balancer to send traffic over.
So I do a little kubectl apply -f to those yaml files I just created. Everything comes up. Next step is to setup the load balancer to forward traffic over. Since I have the nodePort configured as 31645, I just need to tell the load balancer to send traffic that I want to that port. I don’t want to mess with the existing setup so I decide to simply forward http port 8443 over to http port 31645.
Everything should be all set, so let’s open a browser and test
I am getting blocked like I expected! The problem is that I’m coming from my 2.2.2.2 address. What could be the issue? Good thing I told the logs to be sent to stdout so let’s check them for 403s:
kubectl logs -f -n wordpress nginx-9cdf87f68-tss6x|grep 403
...
10.126.32.147 - - [20/Dec/2020:13:37:33 +0000] "GET /admin HTTP/1.1" 403 187 "-" "Mozilla/5.0 (Macintosh; Intel Mac OS X 11_1_0) AppleWebKit/537.36 (KHTML, like Gecko) Chrome/87.0.4280.88 Safari/537.36"
...
I see the problem! That is not my 2.2.2.2 address! That was my request though. It seems that I’m not getting the real IP of the client but instead internal IPs from the load balancer.
Enter the PROXY Protocol
For access control, I didn’t want to rely on the X-Forwarded-For header since it is something that comes from the client. This means that someone could spoof the headers to get around my control. In addition to that, the DigitalOcean load balancer does not send this header so it’s a moot point. DigitalOcean does provide the PROXY Procotol in it’s load balancers but not by default. The short explanation is that this protocol will send in the IP like I want but it requires some configuration. It’s either enable PROXY protocol or not as well and there is no mixing or matching.
Enabling the PROXY Protocol on the load balancer was easy. You simply enable it in the Settings of the load balancer.
It is very important to NOT enable this until Nginx was configured. Otherwise, the site would have gone down. I explain my specific configuration below, but you are also welcome to explore the Nginx documentation on the PROXY Protocol.
Configuring Nginx
In my Testing Out the Digital Ocean Container Registry article, I built nginx with the PROXY protocol capability by enabling the ngx_http_realip module. It was like I wrote that previous article after getting this all working….? With the module already enabled, it was pretty easy to simply update the configuration and go. I added the following line to my sever block:
set_real_ip_from 10.126.32.0/24;
Just like that, I was good to go so I thought. I was now getting denied only sometimes. I checked the logs again to find out why:
kubectl logs -f -n wordpress nginx-9cdf87f68-tss6x
...
10.126.32.147 - - [20/Dec/2020:13:37:33 +0000] "GET /admin HTTP/1.1" 403 187 "-" "Mozilla/5.0 (Macintosh; Intel Mac OS X 11_1_0) AppleWebKit/537.36 (KHTML, like Gecko) Chrome/87.0.4280.88 Safari/537.36"
2.2.2.2 - - [20/Dec/2020:18:35:49 +0000] "POST /admin HTTP/1.1" 200 98 "https://blog.shellnetsecurity.com/wp-admin/post.php?post=93&action=edit" "Mozilla/5.0 (Macintosh; Intel Mac OS X 11_1_0) AppleWebKit/537.36 (KHTML, like Gecko) Chrome/87.0.4280.88 Safari/537.36"
3.3.3.3 - - [20/Dec/2020:13:37:33 +0000] "GET /admin HTTP/1.1" 403 187 "-" "Mozilla/5.0 (Macintosh; Intel Mac OS X 11_1_0) AppleWebKit/537.36 (KHTML, like Gecko) Chrome/87.0.4280.88 Safari/537.36"
...
Let’s chat about the set_real_ip_from statement. We need to add this statement for all potential IP addresses that we trust to provide us with the real client IP. In my case, it turned out that 10.126.32.0/24 was not a large enough block for the internal IP addresses so I needed to change that to a /16. Also, notice the 3.3.3.3 address? That’s the external IP of one of nodes in the kubernetes cluster. Armed with that knowledge, I expanded my server block to include multiple set_real_ip_from statements:
I reloaded everything and tested again and success every time! I got denied when I wasn’t on my 1.1.1.1 or 2.2.2.2 address. I also see others getting denied as well. When I’m sitting on 1.1.1.1 or 2.2.2.2, I’m able to get into my WordPress admin!
Disclosure: I have included some affiliate / referral links in this post. There’s no cost to you for accessing these links but I do indeed receive some incentive for it if you buy through them.
The house use to be full of random computers and networking gear but I’ve reduced the home presence over the years. I’ve messed with a number of cloud providers both inexpensive and expensive. My base for the majority of my toys reside in Digital Ocean. I’ve really liked what they’ve done over the years. Recently, they announced a Container Registry. If you follow this blog, then you remember my post, Posting a Custom Image to Docker Hub. In that post, I explained how to build an image and push it up Docker Hub. Some images might not need to be public for whatever the reason. Needless to say, Digital Ocean’s Container Registry announcement, intrigued me. With the move to WordPress, I figured that I should also build a custom nginx build to run in my Kubernetes cluster on Digital Ocean.
Building the Custom Nginx
This part was pretty easy. I simply created a Dockerfile for the build.
FROM ubuntu
ENV DEBIAN_FRONTEND noninteractive
MAINTAINER Scott Algatt
RUN apt-get update \
&& apt-get install -y libjansson-dev libcurl4-openssl-dev libapr1-dev libaprutil1-dev libssl-dev build-essential devscripts libtool m4 automake pkg-config libpcre3-dev zlib1g-dev\
&& apt -y upgrade \
&& apt -y autoremove \
&& apt-get clean \
&& rm -rf /var/lib/apt/lists/* /tmp/* /var/tmp/* \
&& curl -o /tmp/nginx.tgz http://nginx.org/download/nginx-1.18.0.tar.gz
WORKDIR /tmp
RUN tar zxf nginx.tgz \
&& cd nginx-1.18.0 \
&& ./configure --with-http_realip_module\
&& make \
&& make install
EXPOSE 80
CMD ["/usr/local/nginx/sbin/nginx"]
As you can see from the Dockerfile, this is a really super simple build. It is also not very custom aside from my compile command where I’ve added –with-http_realip_module. This little addition is something that I will use later in a future post (I know everything will be in the future) but you can see what it does by visiting the nginx documentation. Anyhow, there you go. Aside from the configure command, I’m just setting up ubuntu to compile code and I download nginx and compile it. Then expose port 80 and run nginx.
Once you have created the Dockerfile, you can run a build to generate your docker image. You’ll see that my build command tags the build with a name, c-core-nginx, and specific version, 1.1. I would suggest doing this to help keep versions straight in your repository.
% docker build -t c-core-nginx:1.1 .
Sending build context to Docker daemon 21.72MB
Step 1/9 : FROM ubuntu
---> 4e2eef94cd6b
Step 2/9 : ENV DEBIAN_FRONTEND noninteractive
---> Using cache
---> decc285ce9e4
Step 3/9 : MAINTAINER Scott Algatt
---> Using cache
---> 197e4c81b654
Step 4/9 : RUN apt-get update && apt-get install -y libjansson-dev libcurl4-openssl-dev libapr1-dev libaprutil1-dev libssl-dev build-essential devscripts libtool m4 automake pkg-config libpcre3-dev zlib1g-dev && apt -y upgrade && apt -y autoremove && apt-get clean && rm -rf /var/lib/apt/lists/* /tmp/* /var/tmp/* && curl -o /tmp/nginx.tgz http://nginx.org/download/nginx-1.18.0.tar.gz
---> Using cache
---> d5c8a70c412f
Step 5/9 : COPY ./perimeterx-c-core /tmp/perimeterx-c-core
---> Using cache
---> d325026c19b6
Step 6/9 : WORKDIR /tmp
---> Using cache
---> 8fb23db246a3
Step 7/9 : RUN tar zxf nginx.tgz && cd nginx-1.18.0 && ./configure --add-module=/tmp/perimeterx-c-core/modules/nginx --with-threads --with-http_realip_module && make && make install
---> Using cache
---> 25af69d04a9f
Step 8/9 : EXPOSE 80
---> Using cache
---> e74b4cc64160
Step 9/9 : CMD ["/usr/local/nginx/sbin/nginx"]
---> Using cache
---> 6f10e3bebefc
Successfully built 6f10e3bebefc
Successfully tagged c-core-nginx:1.1
After the build completes, you can confirm that your image is listed on your local docker repo
% docker images c-core-nginx
REPOSITORY TAG IMAGE ID CREATED SIZE
c-core-nginx 1.1 6f10e3bebefc 2 weeks ago 584MB
c-core-nginx 1.0 b3673b4bf518 2 weeks ago 584MB
Pushing Your Image to the Container Registry
I’m not going to spend a ton of effort in this section because the Digital Ocean Container Registry announcement I posted above explains the setup really well. At a high level, you simply complete the following steps:
The below image shows a screenshot of my c-core-nginx images that I uploaded to my Container Registry.
Notice something really cool? The size of those images in my local registry is 584MB but they are roughly 194MB when uploaded. They are being compressed in the registry. This is a really nice feature since the initial free tier of Digital Ocean’s Container Registry is a single repo of 500MB.
In the future, you will see how I actually used this new feature for fun and zero profit.
Welcome to 2020! I hope the new year finds everyone in good spirits and ready to continue listening to me babble about my struggles with technology.
So far, the focus has been on using default Docker images for our builds. This is great if you plan to deploy stock instances and only need to serve custom content with some minor configuration tweaks. Note that we were able to make configuration changes using a configMap yaml. What if you needed Nginx modules that weren’t already installed in the base image? Sure, you could come up with some funky CMD statement in your yaml file that tells Kubernetes to install the modules. Of course, that’ll take some time for the pod to be available while it boots up and runs through the install steps. This will also defeat the purpose of what I’m attempting to show you too 🙂
The focus of this article is simple. We’re going to setup a Docker Hub account and build a custom Nginx image to post there. From there, there are some future articles to help us use this new found knowledge to do some cool stuff.
Let’s stop the babble and start the fun!
Creating a Docker Hub Account
This is pretty straight forward so we’ll cover it briefly.
Now that you have a Docker Hub account, you’ll want to create a repo to be able to store your custom docker image. Assuming that you are still signed in from the steps above, you should see a Create a Repository button:
If you don’t see the Create a Repository button, worry not, you can get there by clicking on the Repositories link on the top menu and then the Create Repository button:
On the resulting Create Repository screen, let’s add in some details such as below:
You may call the repo whatever you want and feel free to give it a description. For now, we’re going to make this a public repo. Once you have this information filled out, scroll to the bottom and click Create. You should now see something similar to the below:
Make note of the docker push command in the black background box on the right. In my case, it is
docker push algattblog/testnginximage:tagname
We’ll need this later when we build our custom image.
Configuring Our Custom Nginx Docker Image
In order to keep everything in one place and keep things backed up, we’ll be building this out within our previously defined Git Repo. It’s a private repo so reasonably protected and Github is a really nice place to maintain our backup. So the first step will be to make sure we’re in the root of our repo and we’ll make a new directory to store this image.
$ mkdir nginxdocker
From there, we’ll change into the directory so that we can start with our Dockerfile
$ cd nginxdocker/
Now let’s create a new Dockerfile that looks like the following:
Let’s see what this does…First, we’re going to build this new Docker using ubuntu as our base image. From there, we’re going to install nginx, libnginx-mod-http-lua, libnginx-mod-http-subs-filter, and software-properties-common. We’re installing software-properties-common so that we can add the certbot repo and then add certbot. We’re going to also copy over some custom Nginx configuration files so we won’t need to leverage our configMap anymore. We make sure ports 80 and 443 are exposed to the running container. Finally, the container should run the “nginx” command to start the nginx server.
Next, we’ll want to create those files referenced by the COPY commands. We start by creating the conf directory with and then change into the directory:
$ mkdir conf
$ cd conf
Create the nginx.conf file with the following (Basically, we’re defining a custom log format):
The MOST important item at the bottom of this file would be the daemon off; statement. Without this, our container will start run nginx and then COMPLETE and stop. We want nginx to run in the foreground and not background as a daemon so this is why this is here. Now create the referenced site.conf file.
Next, we need to publish it on Docker Hub (remember that push command from earlier?):
$ docker push algattblog/testnginximage:latest
The push refers to repository [docker.io/algattblog/testnginximage]
010c4615edf3: Pushed
98c06aef3fd3: Pushed
229f4ffc7b88: Pushed
918efb8f161b: Mounted from library/ubuntu
27dd43ea46a8: Mounted from library/ubuntu
9f3bfcc4a1a8: Mounted from library/ubuntu
2dc9f76fb25b: Mounted from library/ubuntu
latest: digest: sha256:4545730a7dd5b5818f0ce9a78666f40ea9a864198665022dc29000a34cc4b402 size: 1778
Testing the New Image in our Cluster
At this point, we’ve got our newly created image uploaded to Docker Hub. The next step is to test it out and see if it works in our cluster. In order to do that, we’ll want to change the image in our webserver.yaml file to reference the newly created image:
Wait for it to build the new webserver pod by keeping an eye on kubectl:
# kubectl get pod
NAME READY STATUS RESTARTS AGE
phpfpm-7b8d87955c-rps2w 2/2 Running 0 3d1h
webserver-6b577db595-wgwwb 2/2 Running 0 25s
Looks like it’s up and running so now let’s check and see if we can test to make sure everything looks good. We’ll start by connecting to the webserver, installing curl, and making sure everything works again.
# kubectl exec -it webserver-6b577db595-wgwwb /bin/bash -c webserver
groups: cannot find name for group ID 65533
root@webserver-6b577db595-wgwwb:/# apt update
Get:1 http://security.ubuntu.com/ubuntu bionic-security InRelease [88.7 kB]
Get:2 http://archive.ubuntu.com/ubuntu bionic InRelease [242 kB]
Setting up libcurl4:amd64 (7.58.0-2ubuntu3.8) ...
Setting up curl (7.58.0-2ubuntu3.8) ...
Processing triggers for libc-bin (2.27-3ubuntu1) ...
root@webserver-6b577db595-wgwwb:/# curl localhost
<html>
<body>
hello world! Everything must be cleaned up at this point
</body>
</html>
root@webserver-6b577db595-wgwwb:/# curl localhost/index.php
hello world from php
We can ignore the groups error for now. Some idiot left out instructions regarding fixing that but not a biggie. Looks we’re serving content properly. Let’s check our nginx configuration to confirm it’s also running the correct config:
root@webserver-6b577db595-wgwwb:/# cat /etc/nginx/nginx.conf
user www-data;
...
log_format graylog2_format '$remote_addr $request_method "$request_uri" $status $bytes_sent "$http_referer" "$http_user_agent" "$http_x_forwarded_for" "$http_if_none_match"';
gzip on;
include /etc/nginx/conf.d/*.conf;
include /etc/nginx/sites-enabled/*;
}
daemon off;
root@webserver-6b577db595-wgwwb:/#
Confirmed! This looks great! You’ve now got a custom Docker image that you can use and expand upon. I know I left you hanging here but if I continued to build my attention span couldn’t tolerate typing anymore. More to come….
In my previous post, I explained how to setup a simple nginx instance that could be used to sync to a private Git repo. The only drawback is that this setup will only serve static pages. What if you wanted to be able to run a server with dynamic code like PHP? I’m glad you asked! In this post, we’ll update our config to include a php-fpm instance to allow us to serve PHP pages.
I have planned these articles out so that they build on each other. With that in mind, I’m assuming you have followed my articles to date and therefore we’ll be simply extended the current deployment.
If you’re impatient like me, just scroll to the bottom and download the full files.
Setting Up The PHP-FPM Instance
First we need to get our PHP-FPM yaml setup. By default, php-fpm runs on port 9000. This means we need a service definition to expose this to the cluster. This will also need access to the git repo we created so we’ll add in the git container spec. Instead of running the nginx image, we’ll run the php-fpm image. In order to make life easy on ourselves, I’m going to use the webserver.yaml from my previous post as a template. I’m going to make the following changes to it:
Replace any reference of “webserver” with “phpfpm”.
Change the following in the service definition
change the port name from http to phpfpm
change the port number from 80 to 9000
Remove the ConfigMap
Remove the definition of it from the top of the file
Remove the references to it in the spec volumes and the container volumeMounts
Change the image of the second container from nginx:latest to php:fpm
Change the containerPort from 80 to 9000
If we’ve done this all correctly, we should have a yaml that looks similar to the below:
Assuming all went well, we should now have our webserver and phpfpm containers up and running:
# kubectl get pod
NAME READY STATUS RESTARTS AGE
phpfpm-b46969c5f-zzh6d 2/2 Running 0 103s
webserver-8fb84dc86-7xw4w 2/2 Running 0 10s
That’s just lovely but what next?
Configuring Nginx for PHP
At this point, we basically have two unassociated containers that are living independently in the same cluster. The only common bond is that they have the same set of files synched from the Git Repo. Next, we need to tell nginx to handle PHP requests and where to send them. This will require us to update our Nginx configMap. We do this by adding a location statement to handle php files like so:
There’s lots going on here in this file but some important items to note. Nginx acts like a reverse proxy when handling PHP files. It simply takes the request and sends to php-fpm. The php-fpm service finds the request file locally, executes PHP on it, and sends the resulting processed output from PHP back to Nginx. Here is the full updated configMap:
With the new configuration running, we’ll need Nginx to reload it. There’s a number of different ways we could do this but I’m going to use a hack that will allow us to test the config and then restart. First step, I want to make sure the new config will work for us:
# kubectl exec -it webserver-8fb84dc86-7xw4w -c webserver -- /usr/sbin/nginx -t
nginx: the configuration file /etc/nginx/nginx.conf syntax is ok
nginx: configuration file /etc/nginx/nginx.conf test is successful
It looks like the configuration is acceptable so let’s reload Nginx.
# kubectl exec -it webserver-8fb84dc86-7xw4w -c webserver -- /usr/sbin/nginx -s reload
2019/12/28 14:01:32 [notice] 2804#2804: signal process started
We should now be ready to commit a PHP file to our repo and test.
Testing Our Configuration
Let’s create a simple PHP file in the html directory of our.
We’ll jump onto the web server, install curl and test:
# kubectl exec -it webserver-8fb84dc86-7xw4w -c webserver -- /bin/bash
root@webserver-8fb84dc86-7xw4w:/# apt update
Hit:1 http://deb.debian.org/debian buster InRelease
Hit:2 http://deb.debian.org/debian buster-updates InRelease
Hit:3 http://security-cdn.debian.org/debian-security buster/updates InRelease
Reading package lists... Done
Building dependency tree
Reading state information... Done
All packages are up to date.
root@webserver-8fb84dc86-7xw4w:/# apt install curl
Reading package lists... Done
Building dependency tree
Reading state information... Done
curl is already the newest version (7.64.0-4).
0 upgraded, 0 newly installed, 0 to remove and 0 not upgraded.
root@webserver-8fb84dc86-7xw4w:/# curl localhost/index.php
hello world from php
A great question to ask is how does php-fpm know which file and where that file exists? Like I said, great question.
This is handled by the fastcgi_param SCRIPT_FILENAME entry. This means that Nginx is going to tell php-fpm that it should try to load the $document_root$fastcgi_script_name file for the request. If you look at our configMap, we define document root as /usr/share/nginx/www/html. Assuming a request comes for index.php into Nginx, Nginx will tell php-fpm to also load /usr/share/www/html/index.php. In an environment where Nginx + PHP live on the same host, this doesn’t appear to be a problem because that file will exist for sure. In our configuration, we running two separate hosts aka containers. So we need to make sure the file exists on both servers in the same location. That’s the easy part! It does! Reason being, we’re using gitsynch on both containers and mounting that synched directory to the same location!
Full Working Configs
In case you want to just cheat and load the configurations, feel free to download them and play around:
My previous post explained how to create a private git repo. On its own, that post is roughly useless unless you planned to maintained some private copy of your project so nobody can see it. In this post, we’re going to put that private repo to use in a Kubernetes environment. A basic assumption is that you already have a Kubernetes environment setup.
Adding Another SSH Key to the Repo
The first step would be to add another SSH Key to our repo. The purpose of this key is to be used to configure access from the container to the repo. We’ll load the SSH key into Kubernetes as a secret. We can’t set a password on this key or we might get prompted for the password during container build and that’s not useful. Also, since the key will not have a password, we won’t give it Read / Write access to our repo.
Generate the SSH Key
As before, we’re going to run the ssh-keygen command but we’ll specify the file where to save the key and just simply hit enter at the password prompt so that it’s not password protected.
imacs-imac:~ scott$ ssh-keygen -t rsa
Generating public/private rsa key pair.
Enter file in which to save the key (/Users/scott/.ssh/id_rsa): /Users/scott/.ssh/GH_RO_key_rsa
Enter passphrase (empty for no passphrase):
Enter same passphrase again:
Your identification has been saved in /Users/scott/.ssh/GH_RO_key_rsa.
Your public key has been saved in /Users/scott/.ssh/GH_RO_key_rsa.pub.
The key fingerprint is:
SHA256:0v0koHVNHdJbt4j2PaNorHa25dXgNl0sQjJB8R3ClPA scott@imacs-imac.lan
The key's randomart image is:
+---[RSA 2048]----+
| .===+o. |
| *o+o.o|
| o + E ooo|
| + + * ..o |
| o S + + + o|
| . + + Bo|
| . o.=.=|
| . *oo.. |
| ..=... |
+----[SHA256]-----+
imacs-imac:~ scott$
Upload the Key to our Git Repo
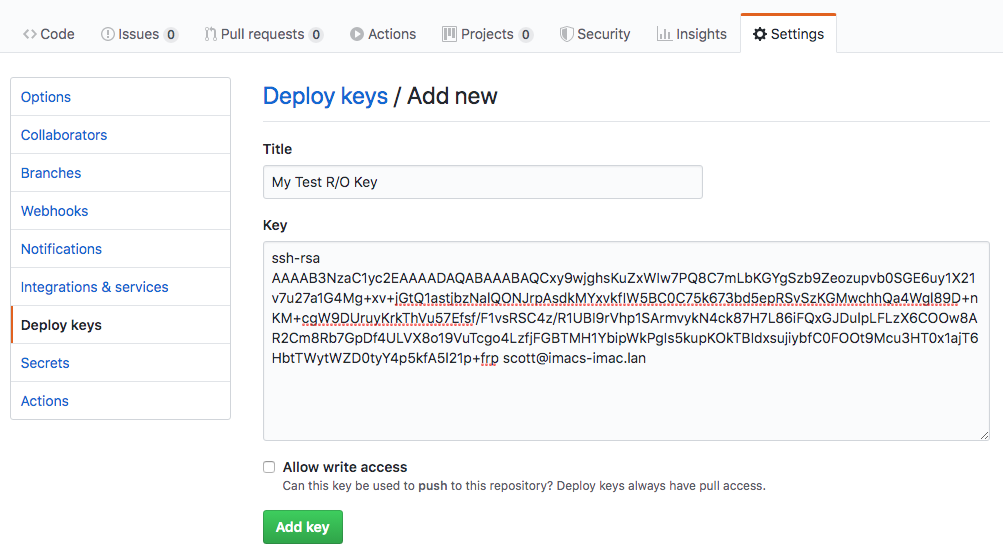
With our new SSH Key created, we’ll want to once again take the contents of the .pub file aka GH_RO_key_rsa.pub if you’re following along and paste that into our repo’s Deploy Keys like below:
Be sure that Allow write access is NOT selected and paste in the contents of the pub file to the Key box. Next, click Add Key. You should now have two keys listed:
Configuring Kubernetes
Now that we have our new Read Only key added to the repo, it’s time to setup Kubernetes. This is going to be a simple configuration so that we can display static HTML pages on our Kubernetes cluster.
Add SSH Key to Kubernetes
In order to have Kubernetes be able to use the SSH key, we need to add it as a secret that we’ll reference in our pod deployment. The first step is to create a known hosts file to be used along with the key so we don’t have to worry about acknowledging any new key messages.
This copies the ssh key from github into the /tmp/known_hosts file. Next, we need to get the contents of our private key file. When we pasted the key into GitHub, we were working with the public key file..aka the .pub file…Since Kubernetes will need to authenticate using this key, it’ll need the private key file…aka the GH_RO_key_rsa file. We’ll use the kubectl command to add the key into Kubernetes:
Now we’re going to create a YAML file to configure and setup everything. The start of that YAML file will be to configure Kubernetes to open a port that directs traffic to port 80 of our resulting pod. From there, we’ll need to setup a pod that runs two separate containers. One container will be our git-synch application and the other will be nginx. We could get into some “complex” discussions and added costs of running a PVC or some other Kubernetes shared storage but we’re only dealing with a small web site that is synched with github so we’re gonna simply leverage local storage on each node by defining two volumes:
This creates two volumes dir and git-secret. The dir is simply an empty directory volume that we’ll be filling with our files that we synch from Github. The git-secret is the SSH Key we added above. This needs to be made available to our git-synch container.
In the nginx container, we’re going to mount the dir volume as /usr/share/nginx. The default nginx image looks for web content, aka document root, in /usr/share/nginx/html. Therefore, we’re going mount the repo as /usr/share/nginx. We mount the dir volume to /git as this is where we’re going to write our synched data.
You can see all of these configurations in the git-synch container configuration such as the target location for our synched files as well as the secret to use.
You’ll want to make sure you change the GIT_SYNC_REPO to match the value of your clone/download link in Github. The GIT_SYNC_DEST should match the name of your repo.
With out configuration file all ready to go, we’ll use kubectl to apply the file:
~# kubectl apply -f webserver.yaml
service/webserver created
deployment.apps/webserver created
~#
After some time, we should be able to check the status and see the pod is online and the service is setup:
~# kubectl get pod
NAME READY STATUS RESTARTS AGE
webserver-686854f667-cwq5f 2/2 Running 5 3m46s
~# kubectl get svc
NAME TYPE CLUSTER-IP EXTERNAL-IP PORT(S) AGE
kubernetes ClusterIP 10.152.183.1 <none> 443/TCP 149m
webserver ClusterIP 10.152.183.195 <none> 80/TCP 5m28s
~#
Testing the Deployment
With everything deployed, we should have a web server up and running that is serving our git repo from the previous post. Without getting into deploying an ingress server and such, let’s take a short cut to test out our deployment. We can do this by connecting to the web server and doing a curl. First, we connect to the web server container:
The above command will connect you to a shell in the container. By default, the nginx image does not have curl installed so we’ll need to install this to test further. Install curl using the below commands:
That works better. Looks like we need to fix something here but first let’s see if making a change to the repo works. Let’s cheat and use the github file editor and make a change to the index.html file like the below:
In case the problem isn’t quite obvious, we are attempting to mount the git repo in a location that nginx isn’t quite looking for. It’s a bad idea to mount the entire git repo as the document root since it could allow people to look at your .git directory and possibly other files that you didn’t consider. In order to fix our deployment and secure just a little further we’re going to first adjust the nginx configuration with a Kubernetes configmap:
This configmap supplies nginx with a new configuration for the default site that tells nginx that the document root is now located in /usr/share/nginx/www/html. We also made some changes to the original webserver.yaml to add this new configuration as well as changing the mount point for git and nginx. The full configuration is here.
root@do-nyc04:/tmp# kubectl get pod -o wide
NAME READY STATUS RESTARTS AGE IP NODE NOMINATED NODE READINESS GATES
webserver-8fb84dc86-5chm5 2/2 Running 0 17s 10.244.1.53 pool-sfo01-ssy1 <none> <none>
root@do-nyc04:/tmp# kubectl exec -it webserver-8fb84dc86-5chm5 -c webserver /bin/bash
root@webserver-8fb84dc86-5chm5:/# apt update;apt -y install curl
Get:1 http://deb.debian.org/debian buster InRelease [122 kB]
Get:2 http://deb.debian.org/debian buster-updates InRelease [49.3 kB]
Get:3 http://security-cdn.debian.org/debian-security buster/updates InRelease [65.4 kB]
Get:4 http://deb.debian.org/debian buster/main amd64 Packages [7908 kB]
Get:5 http://deb.debian.org/debian buster-updates/main amd64 Packages [5792 B]
Get:6 http://security-cdn.debian.org/debian-security buster/updates/main amd64 Packages [167 kB]
Fetched 8317 kB in 2s (3534 kB/s)
Reading package lists... Done
Building dependency tree
Reading state information... Done
All packages are up to date.
Reading package lists... Done
Building dependency tree
Reading state information... Done
The following additional packages will be installed:
...
128 added, 0 removed; done.
Setting up libgssapi-krb5-2:amd64 (1.17-3) ...
Setting up libcurl4:amd64 (7.64.0-4) ...
Setting up curl (7.64.0-4) ...
Processing triggers for libc-bin (2.28-10) ...
Processing triggers for ca-certificates (20190110) ...
Updating certificates in /etc/ssl/certs...
0 added, 0 removed; done.
Running hooks in /etc/ca-certificates/update.d...
done.
root@webserver-8fb84dc86-5chm5:/# curl localhost
<html>
<body>
hello world! Test #2
</body>
</html>
Great news! It looks like it’s fixed. Just to make sure things are working still, let’s make another change and see if it publishes.
root@webserver-8fb84dc86-5chm5:/# curl localhost
<html>
<body>
hello world! Everything must be cleaned up at this point
</body>
</html>
W00t! Looks like everything is working and as we expect. Although, this configuration is mostly useless unless you are actually within the Kubernetes cluster. For the next article, I’ll provide some options and a hack for exposing this web server to the world.