Disclosure: I have included some affiliate / referral links in this post. There’s no cost to you for accessing these links but I do indeed receive some incentive for it if you buy through them.

The house use to be full of random computers and networking gear but I’ve reduced the home presence over the years. I’ve messed with a number of cloud providers both inexpensive and expensive. My base for the majority of my toys reside in Digital Ocean. I’ve really liked what they’ve done over the years. Recently, they announced a Container Registry. If you follow this blog, then you remember my post, Posting a Custom Image to Docker Hub. In that post, I explained how to build an image and push it up Docker Hub. Some images might not need to be public for whatever the reason. Needless to say, Digital Ocean’s Container Registry announcement, intrigued me. With the move to WordPress, I figured that I should also build a custom nginx build to run in my Kubernetes cluster on Digital Ocean.
Building the Custom Nginx
This part was pretty easy. I simply created a Dockerfile for the build.
FROM ubuntu

ENV DEBIAN_FRONTEND noninteractive

MAINTAINER Scott Algatt

RUN apt-get update \
    && apt-get install -y libjansson-dev libcurl4-openssl-dev libapr1-dev libaprutil1-dev libssl-dev build-essential devscripts libtool m4 automake pkg-config libpcre3-dev zlib1g-dev\
    && apt -y upgrade \
    && apt -y autoremove \
    && apt-get clean \
    && rm -rf /var/lib/apt/lists/* /tmp/* /var/tmp/* \
    && curl -o /tmp/nginx.tgz https://nginx.org/download/nginx-1.18.0.tar.gz

WORKDIR /tmp

RUN tar zxf nginx.tgz \
    && cd nginx-1.18.0 \
    && ./configure --with-http_realip_module\
    && make \
    && make install

EXPOSE 80
CMD ["/usr/local/nginx/sbin/nginx"]
As you can see from the Dockerfile, this is a really super simple build. It is also not very custom aside from my compile command where I’ve added –with-http_realip_module. This little addition is something that I will use later in a future post (I know everything will be in the future) but you can see what it does by visiting the nginx documentation. Anyhow, there you go. Aside from the configure command, I’m just setting up ubuntu to compile code and I download nginx and compile it. Then expose port 80 and run nginx.
Once you have created the Dockerfile, you can run a build to generate your docker image. You’ll see that my build command tags the build with a name, c-core-nginx, and specific version, 1.1. I would suggest doing this to help keep versions straight in your repository.
% docker build -t c-core-nginx:1.1 .
Sending build context to Docker daemon  21.72MB
Step 1/9 : FROM ubuntu
 ---> 4e2eef94cd6b
Step 2/9 : ENV DEBIAN_FRONTEND noninteractive
 ---> Using cache
 ---> decc285ce9e4
Step 3/9 : MAINTAINER Scott Algatt
 ---> Using cache
 ---> 197e4c81b654
Step 4/9 : RUN apt-get update     && apt-get install -y libjansson-dev libcurl4-openssl-dev libapr1-dev libaprutil1-dev libssl-dev build-essential devscripts libtool m4 automake pkg-config libpcre3-dev zlib1g-dev    && apt -y upgrade     && apt -y autoremove     && apt-get clean     && rm -rf /var/lib/apt/lists/* /tmp/* /var/tmp/*     && curl -o /tmp/nginx.tgz https://nginx.org/download/nginx-1.18.0.tar.gz
 ---> Using cache
 ---> d5c8a70c412f
Step 5/9 : COPY ./perimeterx-c-core /tmp/perimeterx-c-core
 ---> Using cache
 ---> d325026c19b6
Step 6/9 : WORKDIR /tmp
 ---> Using cache
 ---> 8fb23db246a3
Step 7/9 : RUN tar zxf nginx.tgz     && cd nginx-1.18.0     && ./configure --add-module=/tmp/perimeterx-c-core/modules/nginx --with-threads --with-http_realip_module    && make     && make install
 ---> Using cache
 ---> 25af69d04a9f
Step 8/9 : EXPOSE 80
 ---> Using cache
 ---> e74b4cc64160
Step 9/9 : CMD ["/usr/local/nginx/sbin/nginx"]
 ---> Using cache
 ---> 6f10e3bebefc
Successfully built 6f10e3bebefc
Successfully tagged c-core-nginx:1.1
After the build completes, you can confirm that your image is listed on your local docker repo
% docker images c-core-nginx
REPOSITORY     TAG       IMAGE ID       CREATED       SIZE
c-core-nginx   1.1       6f10e3bebefc   2 weeks ago   584MB
c-core-nginx   1.0       b3673b4bf518   2 weeks ago   584MB
Pushing Your Image to the Container Registry
I’m not going to spend a ton of effort in this section because the Digital Ocean Container Registry announcement I posted above explains the setup really well. At a high level, you simply complete the following steps:
- Install and configure doctl (assuming you had never done this like me)
- Login into your Digital Ocean account
- Go to the Container Registry link
- Create the Container Registry
- Login to your registry using the doctl command
- Push your desired container(s) to the registry
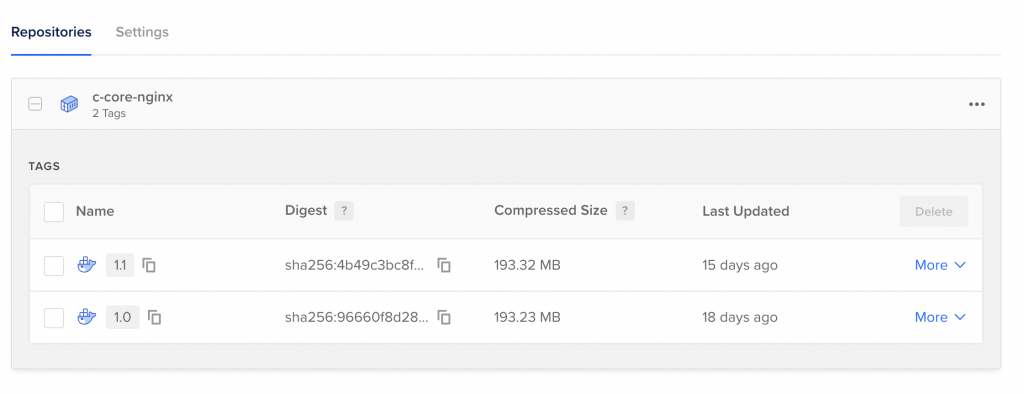
The below image shows a screenshot of my c-core-nginx images that I uploaded to my Container Registry.

Notice something really cool? The size of those images in my local registry is 584MB but they are roughly 194MB when uploaded. They are being compressed in the registry. This is a really nice feature since the initial free tier of Digital Ocean’s Container Registry is a single repo of 500MB.
In the future, you will see how I actually used this new feature for fun and zero profit.